使用 Alertmanager 管理 zabbix 告警消息
由于 zabbix 自身并不支持告警分组及收敛功能,经常会出现告警信息轰炸的情况,为了解决这个情况可以使用 Alertmanager 来管理 zabbix 的告警消息
Alertmanager
特性
Alertmanager 除了提供基本的告警通知能力以外,还主要提供了如:分组、抑制以及静默等告警特性:
分组
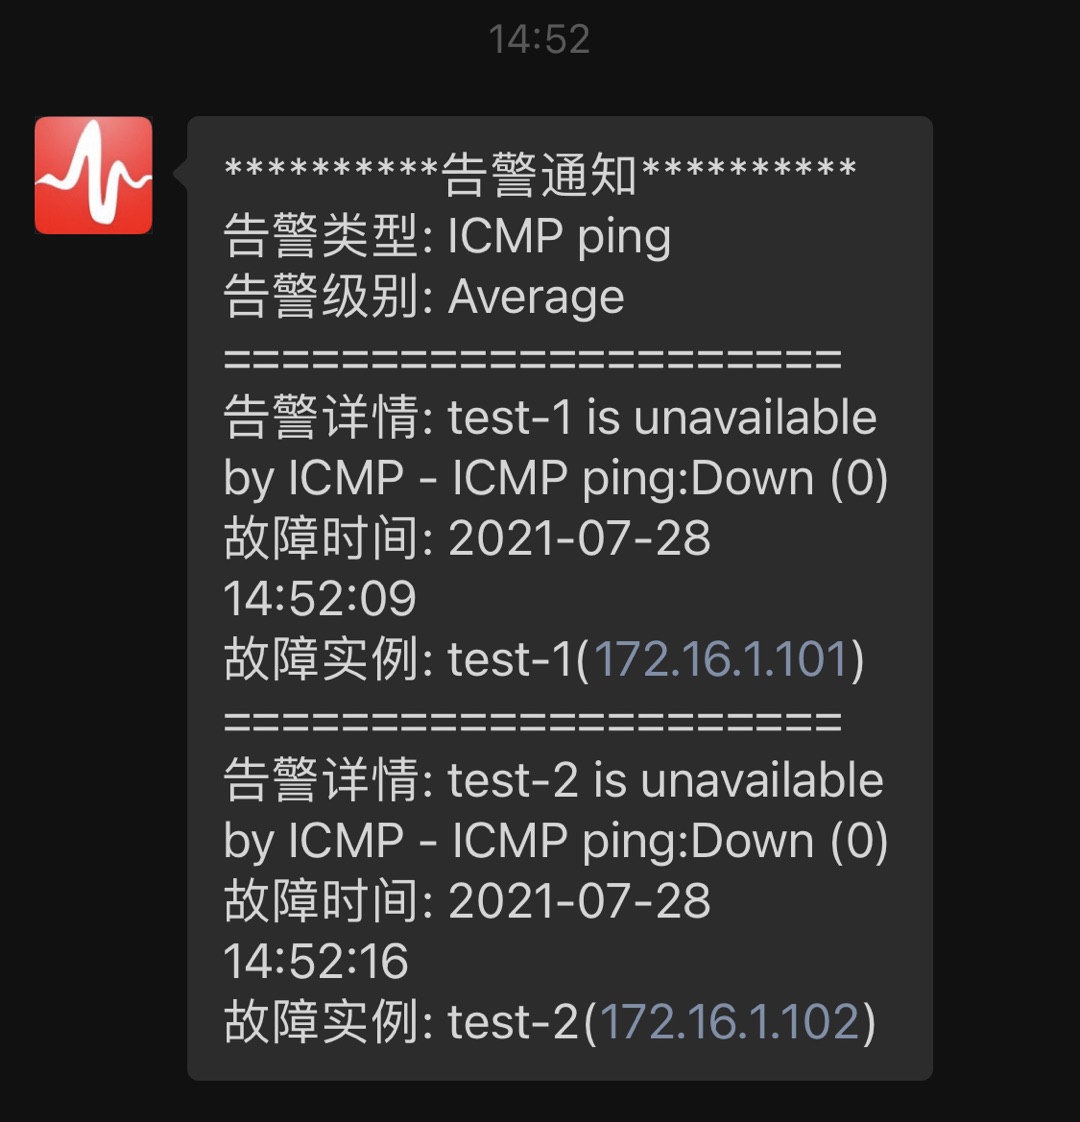
分组机制可以将详细的告警信息合并成一个通知。在某些情况下,比如由于系统宕机导致大量的告警被同时触发,在这种情况下分组机制可以将这些被触发的告警合并为一个告警通知,避免一次性接受大量的告警通知,而无法对问题进行快速定位。
例如,当集群中有数百个正在运行的服务实例,并且为每一个实例设置了告警规则。假如此时发生了网络故障,可能导致大量的服务实例无法连接到数据库,结果就会有数百个告警被发送到 Alertmanager。
而作为用户,可能只希望能够在一个通知中中就能查看哪些服务实例收到影响。这时可以按照服务所在集群或者告警名称对告警进行分组,而将这些告警内聚在一起成为一个通知。
告警分组,告警时间,以及告警的接受方式可以通过 Alertmanager 的配置文件进行配置。
抑制
抑制是指当某一告警发出后,可以停止重复发送由此告警引发的其它告警的机制。 例如,当集群不可访问时触发了一次告警,通过配置 Alertmanager 可以忽略与该集群有关的其它所有告警。这样可以避免接收到大量与实际问题无关的告警通知。 抑制机制同样通过 Alertmanager 的配置文件进行设置。
静默
静默提供了一个简单的机制可以快速根据标签对告警进行静默处理。如果接收到的告警符合静默的配置,Alertmanager 则不会发送告警通知。 静默设置需要在 Alertmanager 的 Web 页面上进行设置。
客户端接口
Alertmanager 现在有两个版本的 api 接口可用(v1/v2), 这里使用 v2 版 api, 接口接收数据结构如下:
[
  {
    "labels": {
      "alertname": "<requiredAlertName>",
      "<labelname>": "<labelvalue>",
      ...
    },
    "annotations": {
      "<labelname>": "<labelvalue>",
    },
    "startsAt": "<rfc3339>",
    "endsAt": "<rfc3339>",
    "generatorURL": "<generator_url>"
  },
  ...
]- labels: 告警的标签,可以自定标签,Alertmanager 通过标签来识别的告警信息
- annotations: 告警消息标签集合
- startsAt: 告警开始时间,格式为 rfc3339
- endsAt: 告警恢复时间,格式为 rfc3339
注意: Alertmanager 默认时区 UTC
配置 Zabbix 告警
配置报警脚本
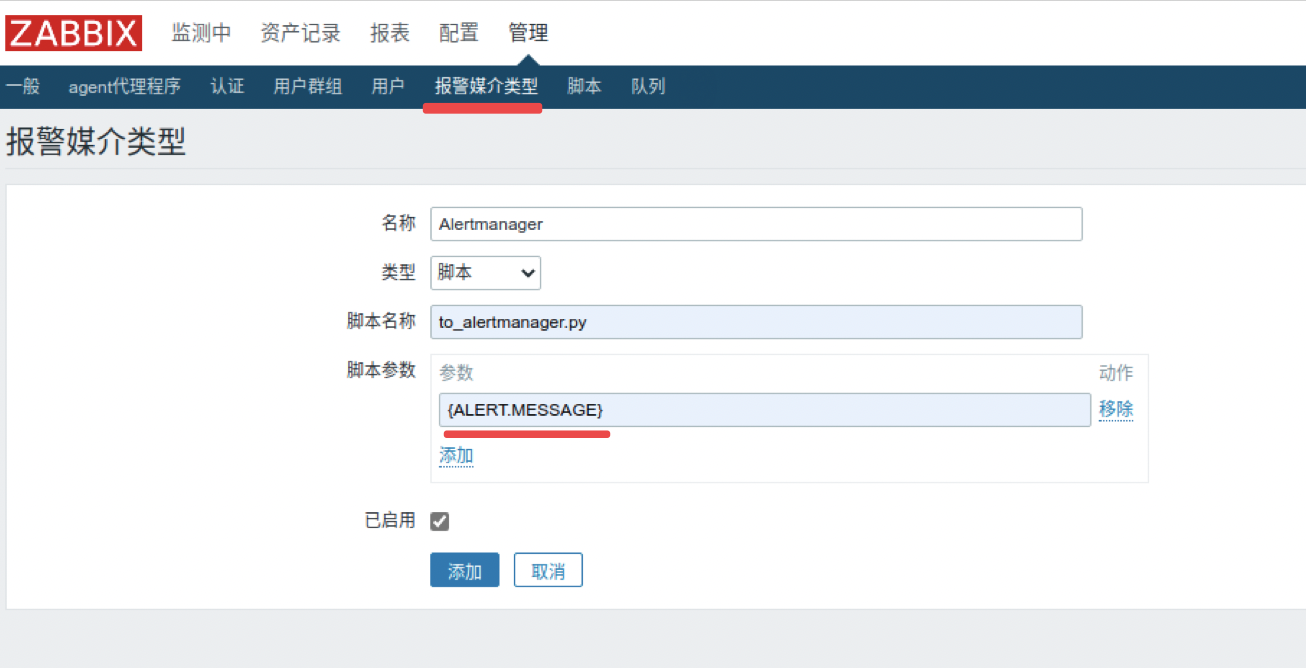
登录 Zabbix Web 页面,点击 “管理 -> 报警媒介类型 -> 创建媒体类型”
- 名称: Alertmanager
- 类型: 脚本
- 脚本名称: to_alertmanager.py (脚本后面步骤中会提供)
- 脚本参数: {ALERT.MESSAGE}
配置报警脚本
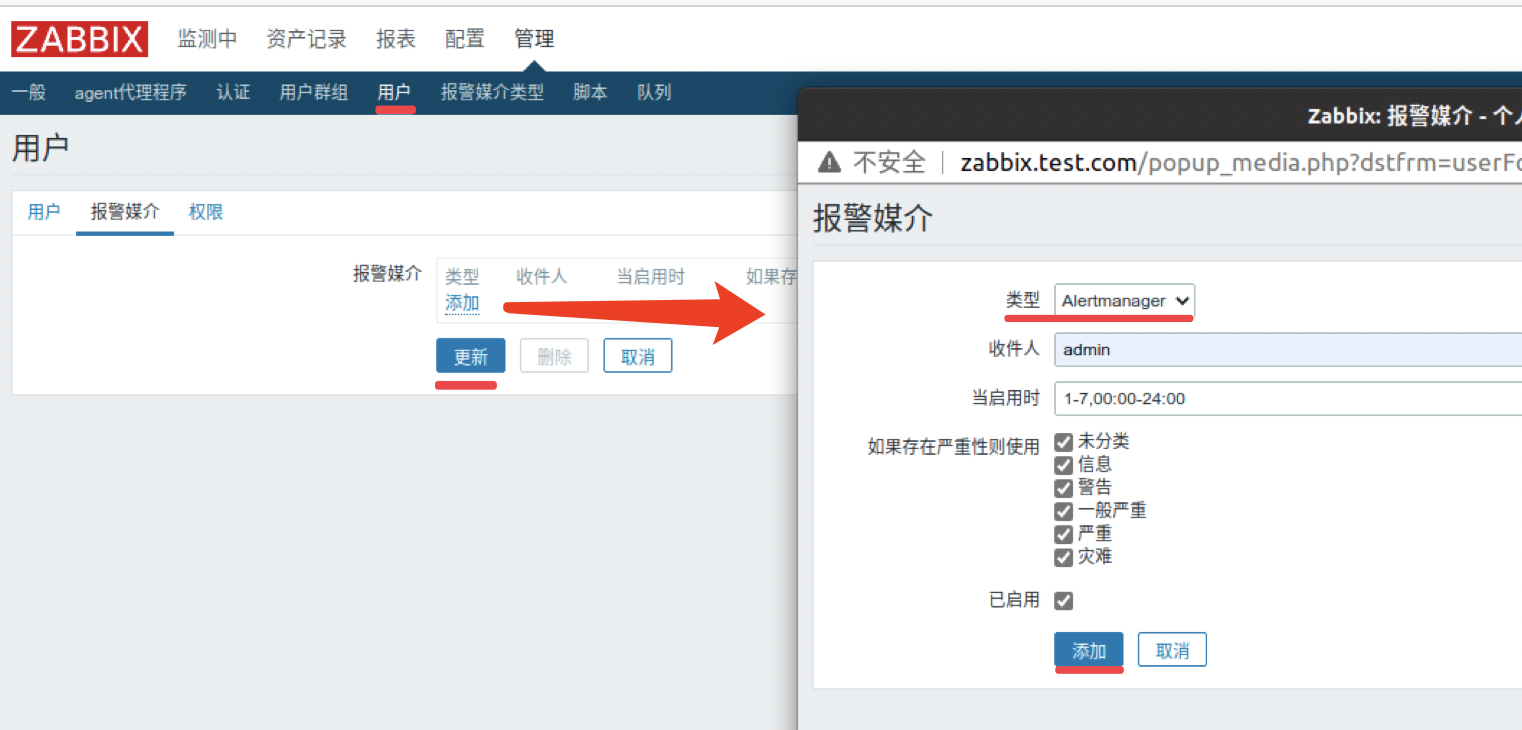
配置用户报警媒介
点击 “管理 -> 用户 -> Admin -> 报警媒介 -> 添加”
- 类型: Alertmanager
- 收件人: 随意,不起作用
配置用户报警媒介
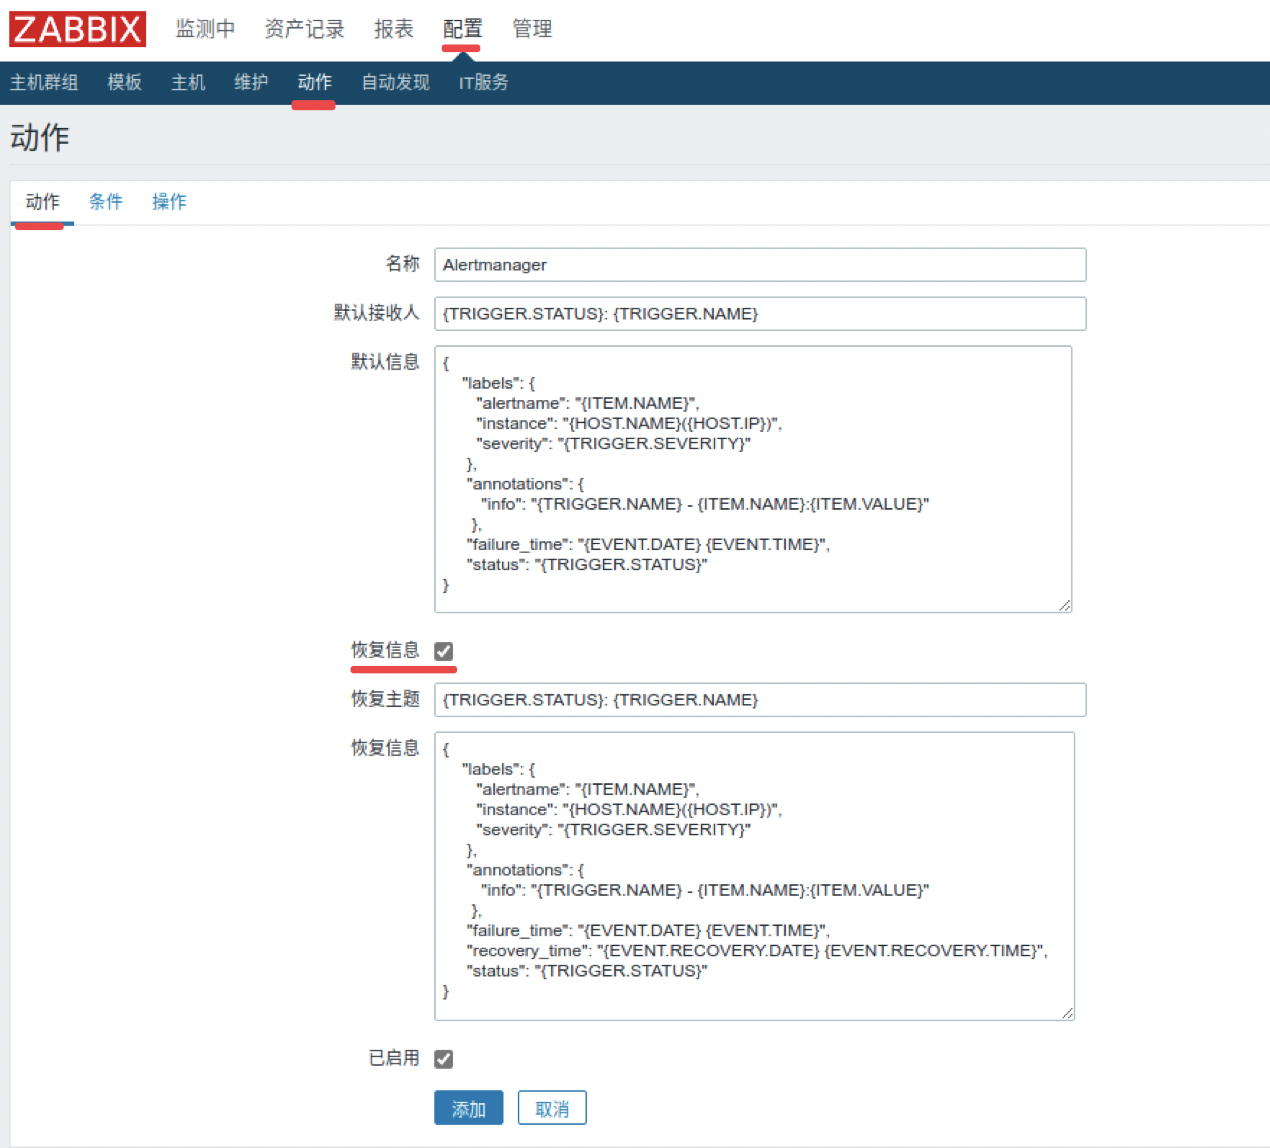
配置动作
点击 “配置 -> 动作 -> 事件源(触发器)-> 创建动作”
- 名称: Alertmanager
- 默认信息: 告警消息内容,这里配置为 json 格式数据,也就是发送脚本的第一个参数 ({ALERT.MESSAGE})
{
    "labels": {
       "alertname": "{ITEM.NAME}",
       "instance": "{HOST.NAME}({HOST.IP})",
       "severity": "{TRIGGER.SEVERITY}"
     },
     "annotations": {
        "info": "{TRIGGER.NAME} - {ITEM.NAME}:{ITEM.VALUE}"
      },
     "failure_time": "{EVENT.DATE} {EVENT.TIME}",
     "status": "{TRIGGER.STATUS}"
}
勾选恢复信息
- 恢复信息: 告警恢复时的消息内容,这里配置也为 json 格式数据,也就是发送脚本的第一个参数 ({ALERT.MESSAGE})
{
    "labels": {
       "alertname": "{ITEM.NAME}",
       "instance": "{HOST.NAME}({HOST.IP})",
       "severity": "{TRIGGER.SEVERITY}"
     },
     "annotations": {
        "info": "{TRIGGER.NAME} - {ITEM.NAME}:{ITEM.VALUE}"
      },
     "failure_time": "{EVENT.DATE} {EVENT.TIME}",
     "recovery_time": "{EVENT.RECOVERY.DATE} {EVENT.RECOVERY.TIME}",
     "status": "{TRIGGER.STATUS}"
}
配置动作
点击,操作选项 -> 添加新的动作操作
- 发送到用户: Admin
- 仅送到用户: Alertmanager
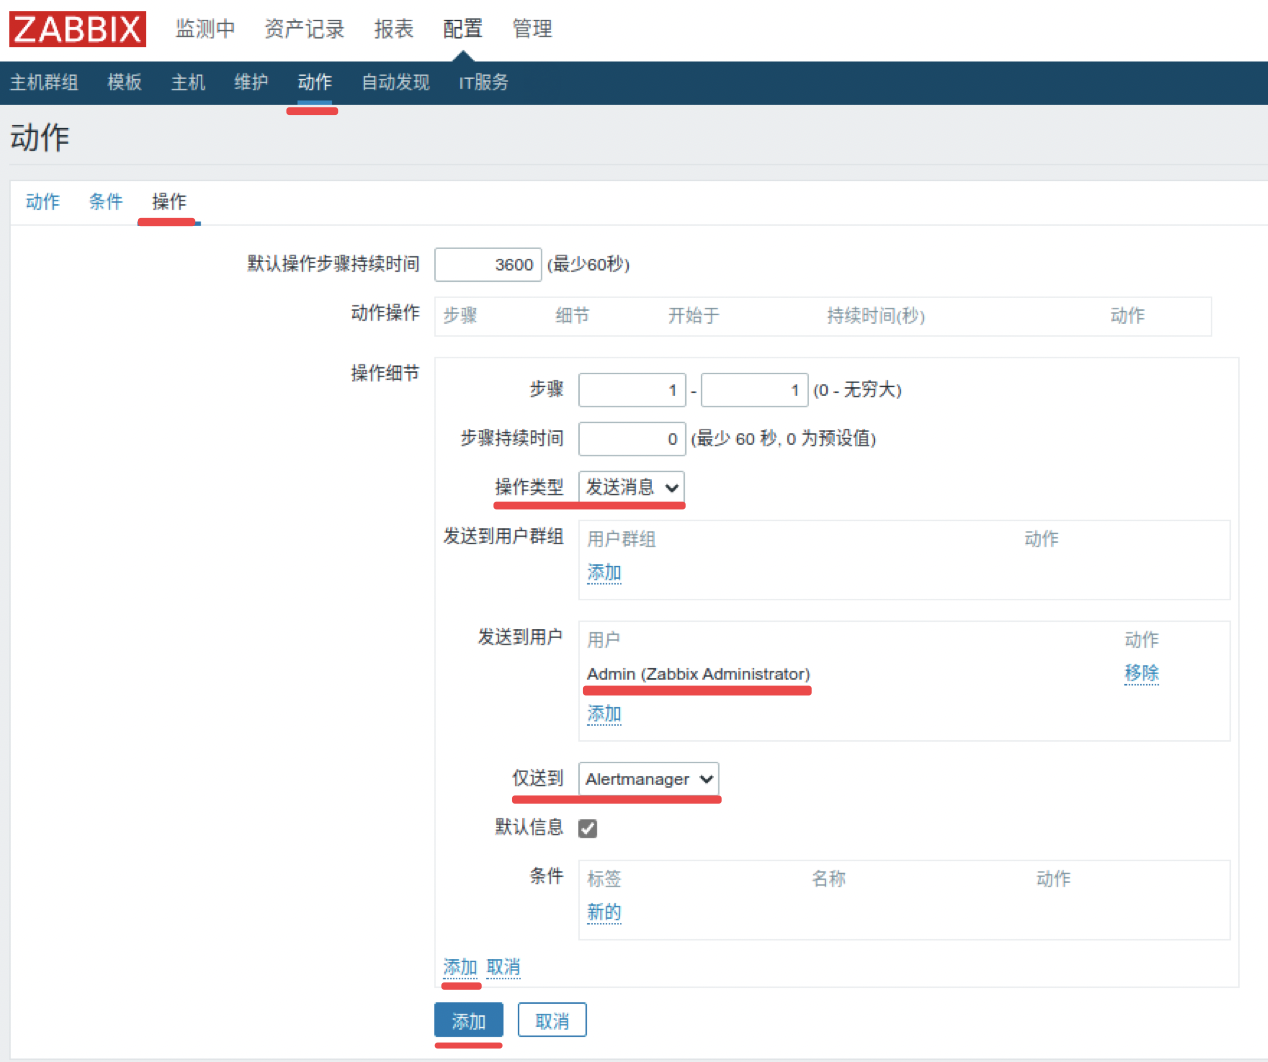
配置动作
点击添加操作, 点击添加完成动作的配置操作
配置 Zabbix Server
编辑 zabbix_server.conf 配置文件添加以下配置项
AlertScriptsPath=/usr/local/zabbix/scripts创建目录 /usr/local/zabbix/scripts
mkdir /usr/local/zabbix/scripts放入告警脚本 to_alertmanage.py 并加上执行权限 chmod +x to_alertmanage.py
#!/usr/bin/env python3
# -*- coding: utf-8 -*-

import sys
import json

from http.client import HTTPConnection
from urllib.parse import urlsplit
from datetime import datetime, timedelta

url = "http://127.0.0.1:9093"
api_url = f"{url}/api/v2/alerts"
headers = {"Content-Type": "application/json"}


def to_rfc_3339(dt, flag=False):
    """以 rfc-3339 标准格式化时间
    AlertManager 接口只接受 rfc-3339 标准的时间
    """
    _d, _t = dt.split()
    y, m, d = (int(i) for i in _d.split('.'))
    H, M, S = (int(i) for i in _t.split(':'))
    t = datetime(y, m, d, H, M, S)
    if flag:
        new = t + timedelta(days=2)
    else:
        new = t
    return new.isoformat() + "+08:00"


def post(url, data, headers):
    u = urlsplit(url)
    if not isinstance(data, str):
        data = json.dumps(data)
    conn = HTTPConnection(u.netloc)
    conn.request('POST', u.path, data, headers)
    response = conn.getresponse()
    text = response.read().decode()
    print(text)


def main(msg):
    try:
        msg = json.loads(msg)
    except Exception as e:
        with open('/tmp/alert.txt', 'a') as f:
            f.write(f"{datetime.now().isoformat(' ')} {str(e)}\n")

    alert_msg = {}
    if msg['status'] == "OK":
        # alert_msg['startsAt'] = to_rfc_3339(msg['failure_time'])
        alert_msg['endsAt'] = to_rfc_3339(msg['recovery_time'])
    else:
        alert_msg['startsAt'] = to_rfc_3339(msg['failure_time'])
        alert_msg['endsAt'] = to_rfc_3339(msg['failure_time'], True)

    alert_msg['labels'] = msg['labels']
    alert_msg['annotations'] = msg['annotations']

    # with open('/tmp/alert.txt','a') as f:
    #     f.write(json.dumps(alert_msg, indent=4))

    post(api_url, [alert_msg], headers)


if __name__ == "__main__":
    main(sys.argv[1])
脚本需要使用
Python3.5及以上版本,如系统没有安装请执行yum install -y python3
重启 Zabbix 服务
systemctl restart zabbix-server部署 Alertmanager
安装 Alertmanager
Alertmanager 安装在和 Zabbix Server 同一台机上,如有空闲机器也可以单独部署
cd /usr/local/src
wget https://github.com/prometheus/alertmanager/releases/download/v0.22.2/alertmanager-0.22.2.linux-amd64.tar.gz
tar xf alertmanager-0.22.2.linux-amd64.tar.gz -C ../
ln -s /usr/local/alertmanager-0.22.2.linux-amd64 /usr/local/alertmanager
cat > /usr/lib/systemd/system/alertmanager.service <<EOF
[Unit]
Description=Prometheus Alertmanager
Documentation=https://prometheus.io
After=network.target

[Service]
Type=simple
WorkingDirectory=/usr/local/alertmanager
ExecStart=/usr/local/alertmanager/alertmanager --config.file=alertmanager.yml
Restart=on-failure

[Install]
WantedBy=multi-user.target
EOF

systemctl enable --now alertmanager
配置 Alertmanager
编辑 alertmanager.yml 示例如下
global:
  resolve_timeout: 5m
  wechat_api_url: https://qyapi.weixin.qq.com/cgi-bin/
  wechat_api_secret:  <企业微信应用密钥>
  wechat_api_corp_id: <企业微信 ID>

# 告警消息模板
templates:
- /usr/local/alertmanager/templates/*.tmpl

# 告警路由规则
route:
  group_by: ['alertname']
  group_wait: 30s
  group_interval: 5m
  repeat_interval: 1h
  receiver: 'wechat-default'  # 默认告警消息接收器,通过 receivers 定义
  routes:  # 定义路由规则,没有时发送至默认接收器(这里为 wechat-default)
  - receiver: wechat-info  # 定义消息接受者
    match:
      severity: info  # 消息匹配规则, 如果告警级别为 info 消息就会发送到 wechat-ops

# 接受器配置
# 企业微信相关配置参考: https://prometheus.io/docs/alerting/latest/configuration/#wechat_config
receivers:
- name: wechat-default
  wechat_configs:   # 企业微信配置
  - send_resolved: true  # 是否接收恢复消息,默认为 false
    message_type: text   # 消息类型
    agent_id: 1000002    # 企业微信应用 ID
    to_user: LiWanggui   # 消息接收人
- name: wechat-info
  wechat_configs:
  - send_resolved: true
    message_type: text
    agent_id: 1000002
    to_user: WangXiaoer

# 消息抑制配置项
inhibit_rules:
  - source_match:
      severity: 'critical'
    target_match:
      severity: 'warning'
    equal: ['alertname', 'dev', 'instance']
配置企业微信消息模板 templates/wechat-alert.tmpl
{{ define "wechat.default.message" }}
{{- if gt (len .Alerts.Firing) 0 -}}
    {{/* 从 .Alerts.Firing 中取数据可以防止发送恢复通知时数据重复 */}}
    {{- range $index, $alert := .Alerts.Firing -}}
        {{- if eq $index 0 -}}
**********告警通知**********
告警类型: {{ $alert.Labels.alertname }}
告警级别: {{ $alert.Labels.severity }}
        {{- end }}
=====================
告警详情: {{ $alert.Annotations.info }}
故障时间: {{ $alert.StartsAt.Local.Format "2006-01-02 15:04:05" }}
{{ if gt (len $alert.Labels.instance) 0 -}}故障实例: {{ $alert.Labels.instance }}{{- end -}}
    {{- end }}
{{- end }}

{{- if gt (len .Alerts.Resolved) 0 -}}
{{- range $index, $alert := .Alerts.Resolved -}}
{{- if eq $index 0 -}}

**********恢复通知**********
告警类型: {{ $alert.Labels.alertname }}
告警级别: {{ $alert.Labels.severity }}
{{- end }}
=====================
告警详情: {{ $alert.Annotations.info }}
故障时间: {{ $alert.StartsAt.Local.Format "2006-01-02 15:04:05" }}
恢复时间: {{ $alert.EndsAt.Local.Format "2006-01-02 15:04:05" }}
{{ if gt (len $alert.Labels.instance) 0 -}}故障实例: {{ $alert.Labels.instance }}{{- end -}}
{{- end }}
{{- end }}
{{- end }}
重载 AlertManage 配置
curl -iX POST http://localhost:9093/-/reload接收告警信息
Zabbix 服务现在可以通过 to_alertmanage.py 将告警消息推送至 Alertmanager,由 Alertmanager 对告警消息进行管理(分组,抑制,静默)和发送至企业微信。
可以找一台机子通过禁 ping 和恢复 ping 进行测试
# 禁 ping
echo 1 > /proc/sys/net/ipv4/icmp_echo_ignore_all
# 恢复 ping
echo 0 > /proc/sys/net/ipv4/icmp_echo_ignore_all